
These irresistible Mini Fruit Tarts are about to become your family’s new favorite treat. Featuring a crisp, buttery shortcrust pastry shell filled with velvety vanilla custard and topped with vibrant fresh fruit, these bite-sized delights look like they came straight from a high-end Italian bakery.
The best part? While they look incredibly fancy, they are surprisingly easy and affordable to make at home. If you’ve been looking for the perfect shortbread crust recipe, look no further!
The Anatomy of a Perfect Tartlet
A classic fruit tart is all about the balance of textures. Our recipe features:
The Crust: A golden, cookie-like shortcrust pastry that provides a satisfying snap.
The Filling: A silky layer of traditional Italian vanilla pastry cream (crema pasticcera).
The Topping: A colorful assortment of fresh, seasonal fruit.
Choosing Your Fruit
For the best results, we recommend using a variety of berries, kiwi, strawberries, tangerines, or mango.
Pro Tip: Stick to fruits that hold their shape. Avoid “mealy” fruits like apples and pears, or overly watery fruits like cantaloupe and watermelon, as these can make your pastry soggy.
Why You’ll Love This Recipe
The Perfect Gift: These sweets are the ideal “thank you” gift for friends or relatives. Bringing a box of homemade tarts always makes a stunning impression.
Party-Ready: Since they are already individually portioned, they are perfect for hosting. They appeal to kids and adults alike!
Better Than a Bakery: There is nothing quite like the flavor of a tart made with fresh ingredients and a homemade touch.
From the first buttery bite to the final burst of fresh fruit, these mini tarts are the ultimate summer dessert—refreshing, light, and absolutely beautiful. Follow our step-by-step instructions below to create an impressive Italian dessert that will have everyone asking for the recipe!

Ingredients Mini fruit tarts
Italian Pastry Cream
Tartlet crust
Tools Mini fruit tarts
Steps Mini fruit tarts
Italian Pastry Cream
Heat the Milk: Place the milk in a medium saucepan over medium heat. Heat until it is steaming and hot to the touch, but do not let it reach a boil. Remove from heat and set aside.
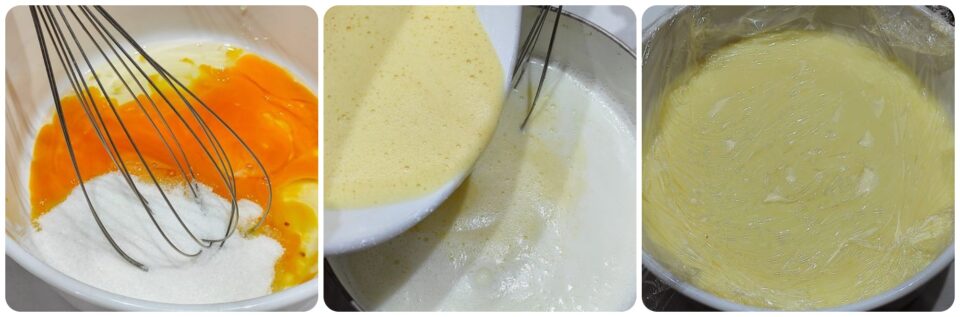
Whisk the Base: In a separate mixing bowl, whisk together the egg yolks, sugar, and cornstarch. Continue beating until the mixture is pale, smooth, and completely combined.
Temper the Eggs: To prevent the eggs from scrambling, slowly drizzle the warm milk into the egg mixture while whisking constantly. Once all the milk is incorporated, stir in the vanilla extract.
Thicken the Custard: Pour the mixture back into the saucepan and return it to medium heat. Whisk continuously—making sure to scrape the bottom and corners of the pan—until the mixture comes to a gentle boil and begins to thicken significantly.
Cook Out the Starch: Once thickened, allow the custard to simmer for about 1 minute. This step is essential to “cook out” the taste of the cornstarch and ensure a velvety texture.
Seal and Chill: Transfer the custard to a clean bowl. Immediately cover it with plastic wrap, pressing the wrap directly onto the surface of the cream; this prevents a skin from forming.
Cool: Let the bowl sit at room temperature for 10 to 15 minutes, then refrigerate until completely chilled and set.
Tartlet crust
Cream the Butter and Sugar: Using an electric mixer, beat the butter until it is smooth and creamy. Add the sugar and continue to beat until the mixture is well-combined and pale.
Incorporate the Eggs: Gradually add the eggs, beating well after each addition. Take care not to overmix at this stage, as overworking the dough can make it difficult to handle later.
Add Dry Ingredients: Gently fold in the flour and a pinch of salt until the dough just starts to come together.
Knead and Chill: Turn the dough onto a lightly floured surface and knead it very briefly until smooth. Be gentle; heavy handling will result in a tough crust. Shape the dough into a ball (or disk), wrap it tightly in plastic wrap, and refrigerate for 30 minutes.
Prepare the Pans: Lightly grease and flour your mini tart pans to ensure the crusts release easily after baking.
Roll Out the Dough: Work with half of the dough at a time, keeping the rest in the fridge. Roll the dough between two sheets of parchment paper to a thickness of 5 mm. If the dough sticks, a light dusting of flour will help. If you notice cracks, simply flip the dough over and continue rolling.
Cut and Shape: Use a round cookie cutter (approximately 3.5 inches or 88 mm) to cut circles slightly larger than your pans. Gently press the dough into the molds, trimming any excess from the edges. Prick the base two or three times with a fork—this prevents the pastry from puffing up during baking.

The Secret Step: Place the lined pans in the freezer for 20 minutes before baking. This helps the pastry keep its shape and prevents it from shrinking in the oven.
Bake: Preheat your oven to 350°F (180°C). Bake for 12–14 minutes, or until the edges are beautifully golden brown.
Cool: Carefully remove the tart shells from their pans and transfer them to a wire rack to cool completely before filling.

To assemble Mini fruit tarts
Prepare the Fruit: Wash your chosen fruit and pat it dry thoroughly. Any excess water can thin the custard or make the crust soggy. Peel the tangerines and bananas, and slice any larger fruits into uniform pieces.
Fill the Shells: Spoon or pipe a generous amount of the chilled Italian pastry cream into each tartlet base. Use the back of a spoon to spread it evenly, leaving just enough room for your fruit toppings.
Arrange with Care: Artfully arrange your fresh fruit on top of the cream. Gently nestle the pieces into the filling to ensure they stay in place. For a professional look, try alternating colors and textures—place a vibrant kiwi slice next to a deep red raspberry or a bright tangerine segment.
The Professional Glaze: To give your tarts that signature bakery-style shine and keep the fruit from drying out, lightly brush the tops with a drizzle of apricot jam. (If the jam is too thick, simply warm it with a splash of water and strain it first).
Chill and Serve: Store the finished tarts in the refrigerator until you are ready to serve. They are best enjoyed the same day they are assembled to ensure the crust stays perfectly crisp.

MY Dessert
If you like my recipes you can follow my faceboke page
You can follow me on pinterest by clicking
If you prefer my instagram channel click
YouTube channel Here
Have you made this recipe? We’d love to hear from you. Leave us a comment below.

How to Store Your Tarts
Ready to Serve: These tarts are at their absolute best the day they are assembled. The contrast between the crisp shell and the creamy filling is most prominent in the first 6 to 8 hours.
In the Fridge: Store any leftovers in an airtight container in the refrigerator for up to 2 days. Note that the crust will naturally soften slightly over time as it absorbs moisture from the custard.
Pro Prep Tip: If you want to get ahead, you can bake the pastry shells and make the pastry cream 2 days in advance. Store the shells in an airtight container at room temperature and the cream in the fridge. Assemble them just before serving to keep that perfect “snap” in the crust!
Delicious Variations to Try
While the classic vanilla and fresh fruit combination is a timeless Italian favorite, you can easily customize this recipe:
Chocolate Lover’s Twist: Brush the inside of the baked tart shells with a thin layer of melted dark chocolate before adding the custard. This not only tastes amazing but also creates a moisture barrier that keeps the crust crisp even longer!
Zesty Citrus: Add the zest of a lemon or orange to your pastry dough or whisk it into the custard for a bright, refreshing citrus punch.
Creamy Indulgence: For an even richer filling, fold a little whipped cream into your chilled pastry cream to create Diplomat Cream (Chantilly all’italiana). It’s incredibly light and airy.
Glaze Alternatives: If you don’t have apricot jam, a red currant jelly works beautifully for red fruits, or a simple honey drizzle can add a lovely floral sweetness.
Frequently Asked Questions (FAQ)
Can I make the tart shells in advance?
Yes! You can bake the shortcrust shells up to 3 days in advance. Store them in an airtight container at room temperature in a cool, dry place. If it’s very humid, you can keep them in the fridge to maintain their crispness
Why did my tart crust shrink during baking?
Crust shrinkage usually happens if the gluten in the dough wasn’t relaxed or if the dough was too warm. To prevent this, make sure to chill the dough twice: once after mixing and again for 20 minutes in the freezer once the pans are lined.
How do I prevent the crust from getting soggy?
The best way is to assemble the tarts as close to serving time as possible. For extra protection, you can brush the inside of the cooled shells with a thin layer of melted white or dark chocolate. This creates a “seal” between the cream and the pastry.
Can I use frozen fruit for the topping?
We highly recommend using only fresh fruit. Frozen fruit releases too much moisture as it thaws, which will bleed into the custard and make the pastry soggy. Stick to fresh, seasonal picks for that professional look and taste.
I don’t have mini tart pans. What else can I use?
No problem! You can use a standard muffin tin. Just cut your dough circles large enough to come about halfway up the sides of the muffin cups. They will have a slightly different shape but will taste just as delicious
Varied doses for servings