
No-Bake Chocolate Biscuit Cake (Easy 10-Minute Recipe). If you are looking for a rich, fudgy, and ridiculously easy dessert that requires zero baking and absolutely no eggs, you’ve just found it. This No-Bake Chocolate Biscuit Cake is the ultimate lazy-day treat that looks like it came from a pastry shop but comes together in just 10 minutes.
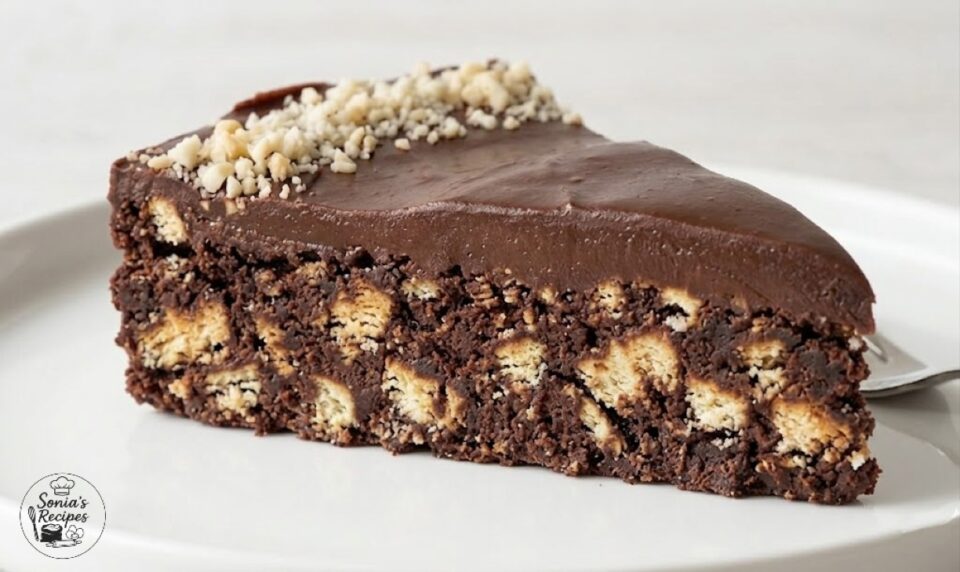
Imagine crunchy, buttery biscuits smothered in a velvety, glossy chocolate glaze. It’s the perfect combination of textures, and the best part? You probably already have all the ingredients in your pantry right now.
Whether you need a last-minute dessert for unexpected guests, a kid-friendly weekend project, or just a quick cure for your chocolate cravings, this recipe is a total game-changer.

Ingredients No-Bake Chocolate Biscuit Cake
For the base
For the glaze
- Power 706,20 (Kcal)
- Carbohydrates 61,83 (g) of which sugars 35,15 (g)
- Proteins 10,42 (g)
- Fat 49,57 (g) of which saturated 29,65 (g)of which unsaturated 15,68 (g)
- Fibers 7,55 (g)
- Sodium 539,00 (mg)
Indicative values for a portion of 160 g processed in an automated way starting from the nutritional information available on the CREA* and FoodData Central** databases. It is not food and / or nutritional advice.
* CREATES Food and Nutrition Research Center: https://www.crea.gov.it/alimenti-e-nutrizione https://www.alimentinutrizione.it ** U.S. Department of Agriculture, Agricultural Research Service. FoodData Central, 2019. https://fdc.nal.usda.gov
Tools No-Bake Chocolate Biscuit Cake
Steps No-Bake Chocolate Biscuit Cake
How to Make the No-Bake Biscuit Base ( 9-inch Springform Pan )
The base of this chocolate cake is incredibly simple and doesn’t require a food processor or mixer. Follow these easy steps for a perfectly crunchy and compact texture:
Crush the biscuits: In a large mixing bowl, roughly crush the biscuits or graham crackers using your hands. Do not crush them into a fine powder! Leaving some larger, bite-sized chunks will give the cake its signature rustic look and a satisfying crunch.
Combine the dry ingredients: Add the granulated sugar and unsweetened cocoa powder to the crushed biscuits. Give it a good toss with a spoon to distribute the cocoa evenly.
Add the wet ingredients: No-Bake Chocolate Biscuit Cake
Pour in the melted butter (make sure it has cooled down slightly and isn’t boiling hot) and the milk. Stir well until all the biscuit crumbs are fully coated and moistened.
Prep the pan: Take a 9-inch (22 cm) springform pan. For easy removal, line the bottom with parchment paper and the sides with plastic wrap or strips of parchment paper.
Press and compact: Pour the mixture into the prepared pan. Using your hands, the back of a spoon, or the flat bottom of a glass cup, press down firmly to level the mixture and create a tight, compact base.
Chill: Transfer the pan to the refrigerator for at least 30 minutes. This step is crucial, as it allows the butter to solidify, ensuring the cake holds its shape perfectly when sliced.
How to Make the Quick & Glossy Chocolate Glaze
While your biscuit base is setting in the fridge, it’s time to prepare the best part: the rich chocolate topping. Here is how to get it perfectly smooth and lump-free:
Melt the chocolate: Finely chop the milk chocolate so it melts quickly and evenly. Place it in a heatproof bowl along with the milk, and set it over a pot of gently simmering water (double boiler method).
💡 Baker’s Tip: Make sure the bottom of the bowl does not touch the water underneath, or the chocolate might overheat and seize.
Stir until silky:
Using a spatula, stir continuously until the chocolate is completely melted, smooth, and glossy.
Let it cool slightly: Remove the glaze from the heat and let it sit for a few minutes to cool down slightly. You don’t want to pour it boiling hot onto the base, as it might melt the butter in the biscuits.
Assemble the cake: Take the chilled base out of the fridge and pour the chocolate glaze right into the center. Use your spatula to gently smooth it out to the edges in an even layer.
The final touch:
To make your cake look like it came straight from a bakery, garnish the top with chopped hazelnuts. The contrast between the velvety glaze and the crunchy nuts is absolutely irresistible!
The final chill: Pop the cake back into the fridge for at least 2 hours (or until the glaze has fully set). Slice, serve, and enjoy!

If you enjoy my recipes and want to stay updated with new ideas, tips, and inspiration, feel free to follow me on my social channels!
👉 Follow me on Facebook for daily updates, new recipes, and cooking inspiration. here
Discover more on Pinterest — click here to explore and save your favorite dishes!
👉 Join me on Instagram by clicking here for behind-the-scenes moments, stories, and beautiful food photography.
👉 Subscribe to my YouTube channel here to watch my recipes come to life in video format!
How to Store Your Chocolate Biscuit Cake
One of the most common questions I get is, “How long does no-bake cake last in the fridge?” Here is everything you need to know to keep it tasting fresh and decadent:
In the Fridge: This cake stores beautifully for 3 to 4 days. I highly recommend covering it with a cake dome or wrapping it tightly in plastic wrap to prevent the chocolate glaze from absorbing any fridge odors.
In the Freezer: Want to make it last longer? You can freeze it! Slice the cake first, wrap each slice individually in plastic wrap, and place them in a freezer-safe bag. It will keep perfectly for up to 1 month.
The Thawing Trick: Before serving frozen slices, let them thaw in the refrigerator for a couple of hours to regain that perfect, fudgy texture.
Pro Cutting Tip: For clean, bakery-worthy slices, dip your sharp knife into a jug of hot water and wipe it dry with a towel before making each cut. The warm blade will glide right through the glossy glaze!
🎨 Flavor Variations: Customize Your Biscuit Cake
This recipe is an amazing base that you can easily tweak depending on what’s in your pantry. Here are a few fun ideas to mix things up:
The Coffee Boost: For a mocha twist, dissolve a teaspoon of instant espresso powder into the milk before mixing, or lightly splash the crushed biscuits with a tablespoon of cooled brewed coffee.
White Chocolate Swirl: For a gorgeous marble effect, melt a handful of white chocolate chips and drizzle them over the milk chocolate glaze, then use a toothpick to gently swirl them together.
Go Nuts: Swap the hazelnuts for toasted sliced almonds, chopped pistachios, or even crushed walnuts. The bright green of the pistachios looks absolutely stunning against the dark chocolate!
Frequently Asked Questions (FAQ)
Why does my biscuit base crumble when I slice it?
If your base is falling apart, it’s usually due to one of two things:
Not enough moisture: Make sure you don’t skimp on the butter or milk, as they act as the “glue” holding the crumbs together.
It hasn’t chilled enough: The butter needs time to go completely solid again. Give it at least 30 to 60 minutes in the fridge before pouring the glaze on top.
Can I use oil instead of butter?
Yes, but with a catch! You can easily swap the butter for refined coconut oil (which solidifies beautifully when cold) using a 1:1 ratio. I don’t recommend vegetable or vegetable seed oils, as they stay liquid at room temperature and will make your base way too soft.
How do I make the chocolate glaze extra shiny?
The baker’s secret to a mirror-like sheen is adding a teaspoon of honey or corn syrup to the chocolate while it melts with the milk. Also, stir gently with a spatula rather than a whisk so you don’t trap any air bubbles!
I don’t have a springform pan. What can I use
No worries at all! You can use a standard cake pan or a rectangular baking dish. Just make sure to line it generously with plastic wrap, leaving plenty of overhang on the sides. Once the cake is completely set, you can use the overhang to gently lift the cake right out of the dish.
Can I make this recipe vegan?
You sure can. Just ensure your biscuits are vegan-friendly (Graham crackers or Oreos often are!), use a plant-based stick butter, and swap the milk for soy or almond milk. Milk chocolate can be swapped for your favorite dairy-free dark or vegan milk chocolate alternative.
Varied doses for servings